Profile builder
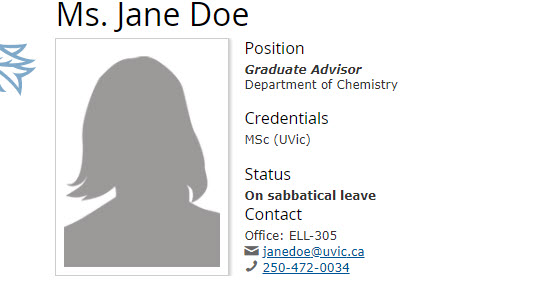
The profile builder lets you create a listing of all the people in your department. Each person gets their own profile page with photo and contact information.
Note: The fields with a red star are required fields.
To create a profile:
- Click on Add Content.

- Select the UVic Pages folder, then select Profile.

- The correct folder for profiles in your site should appear under Placement Folder. Enter a Display Name for the profile in trhe field provided. The first and last names should be capitalized.

- Click on the X beside the placeholder image to remove it.

- Click on choose file to add a different image.

- Click on Browse and navigate to find an image in your site's assets folder.

- Once you've located the image, click on the radio button next to it to select.

- Then click on Choose.

- You'll see that the image has been selected. Select a Title for the person if you wish.

- Enter the First name and Last name for the person in the fields provided.

- Enter the person's status and qualifications - optional.
- Enter the job title and area - optional.
- Enter the department and email address - optional.
- Enter the phone number and office location - optional.
- If the person has another profile in a different department on campus or their own personal website, you can include the URL in the Profile website field, and include the name of the department or name of their personal website, in the Profile website label field.
- Enter a short description for the person under Preview profile description. Copy that text and paste it in the full profile description area below.

- Paste short description and dd some additional details under full profile description.

- Some profiles also include a block to display additional information, such as a tabs block or accordion. To link to the block you can click on Choose Block and navigate to find it in your site. Under Social Media you will see that the share icons are turned off by default. To turn them on, you can click on Yes.

- When you are finished creating the profile, click on the ellipsis and then click on submit.

- You'll see that your profile has been created successfully.