Install the IBM Spectrum Protect client: Mac OS X
 Storage and backups
Step 1: Register your computer for TSM
Note: IBM Spectrum Protect is compatible with Mac OS 10.11-10.13.
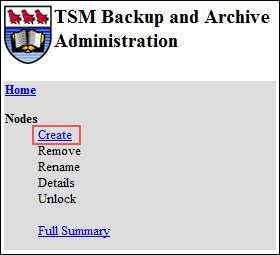
To register your computer, visit the online administration page. Login with your primary NetLink ID and password.
- Click on Create, located under Nodes.
- Name your node appropriately by following the instructions on the administration page. Nodes have three components that must combine to make a unique name within TSM:
- The first component is your department code. Select the appropriate one from the drop-down list (by default, the department you are associated with will appear at the top of the list).
- The second is a sub-group name within your department. You can enter a pre-existing sub-group or create your own.
- The third can be anything you wish. You can also create an additional sub-group by separating values with a period.
Be sure to select your operating system from the corresponding drop-down list and click Create. If necessary, you can rename or remove accounts after they have been created.
Step 2: Download the TSM client
- Download the TSM client for Mac OS X.
- A window should open. Save the file to your computer.
- Find and double click on the file to mount the IBM Spectrum Protect disk image on your desktop.
- Double click on the IBM Spectrum Project.pkg package to begin.

- Click Continue on the Introduction page.
- Click Continue on the Read Me page.
- Click Install.
- Enter your computer's Administrator name and password. Once the installation is complete, click Close.
- In the Finder, return to the IBM Spectrum Protect disk image containing the installer.
- Drag both dsm.sys and dsm.opt into the Tivoli Storage Manager folder as indicated in the screenshot, below.

- In the Finder, navigate to the Applications folder and then open the IBM Spectrum Protect folder. Double click on IBM Spectrum Protect Tools for Administrators.

- Select IBM Spectrum Protect and click OK. Enter the credentials for an administrator account when prompted.

- If prompted for a TSM Login, click CANCEL.

- On the next screen, click OK.

- When asked if you wish to continue, click Yes.

- In the new IBM Spectrum Protect window, click Edit in the top menu and select Client Preferences.

- Under Common Options, update the Node Name field (ENTER.NODENAME.HERE in this example) with your personal TSM node name.

In the lect sidebar, click the Authorization button.

- Under the section "Password access" edit the line under Password Generate:
Location: /Users/username/Library/Preferences/Tivoli Storage Manager
Replace "username" with the username you use to log into the computer. For example, if your login is "mattsmith" then the line will read:
Users/mattsmith/Library/Preferences/Tivoli Storage Manager

- Click the Apply button. If a warning box appears, click the OK button. Finally, click the OK button in the preference editor window.
***If you are using Apple's Time Machine to back-up your computer, you MUST exclude time machines back-ups from TSM. Click here for step-by-step instructions for excluding Time Machine back-ups from IBM Spectrum Protect back-ups.
- Quit IBM Spectrum Protect.
- In the Finder, navigate to the Application folder and open the IBM Spectrum Protect folder. Double-click on IBM Spectrum Protect for Administrators.
- When prompted, enter the password for the TSM node. After you enter the password, press the Login button.

- Configuration is now complete.
See the document TSM initiate overnight backups: Mac OS X for further instructions.